
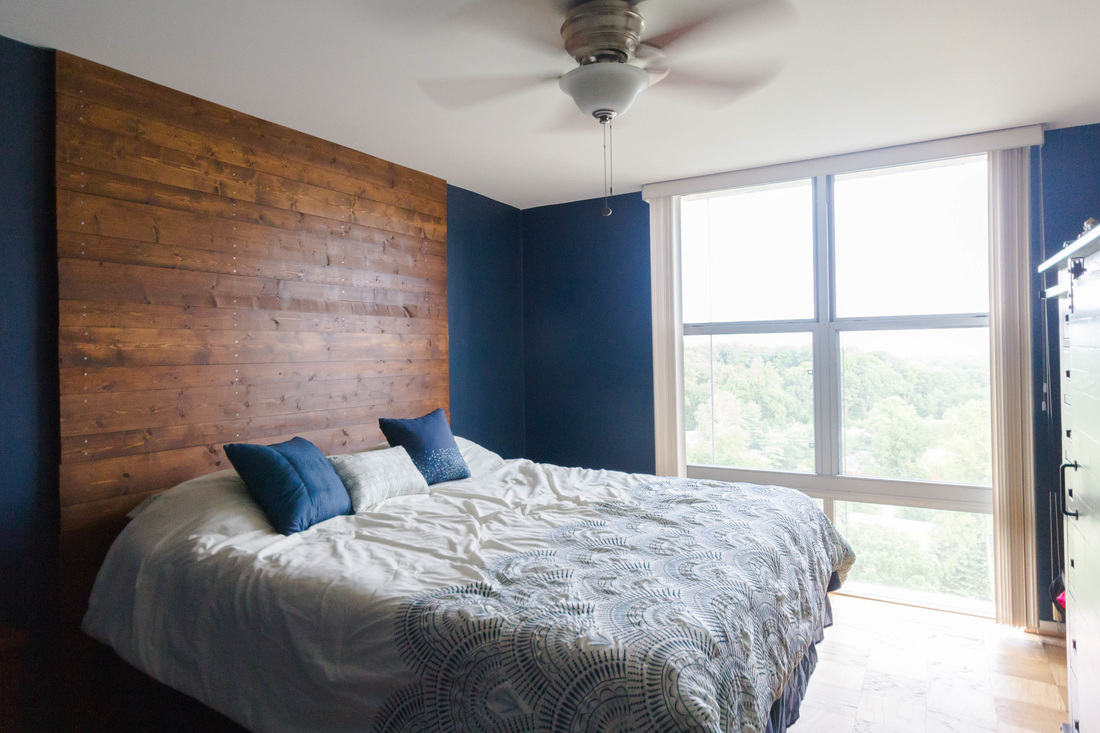
Earlier this summer I shared the amazing floor-to-ceiling wooden headboard Cliff made for our bedroom. It's the focal point in an entire bedroom makeover we're slowly but surely working our way through. We received so many compliments on it (thanks, everyone!!) and even more questions about how we made it, so Cliff created some step-by-step instructions of the entire process.
This was Cliff's first major home improvement project and even though it turned out stunning, that doesn't mean there weren't hiccups along the way. That's life. So many blogs (including the one we relied on for this project) show only the before and after, and make it seem like the entire project was flawless. Cliff and I felt it was very important to keep things real. That's why he talks about how difficult it was to find a right stain and why we demonstrate just how much stud finders lie.
If anyone reading this feels inspired to take on your own project, be it a headboard or something else, take it from us: There will be ups and downs, but with a lot of planning and a little confidence, we know you'll do great!
Guest post by Cliff Starkey
Since I’m in education, I generally get summers off. Being lazy and playing video games all day might sound like a dream, but honestly, it gets a little old after a couple days. So, I try to keep busy during the long days by catching up on reading, writing, and self-written honey-do lists. Those lists generally consist of simple things: clean the kitchen, reorganize the linen closet—but now that we’re homeowners, those tasks now include things like painting (and re-painting) and mounting televisions.
However, my latest project dwarfed them all—a floor-to-ceiling wooden headboard!
The idea was born after we had spent a few weeks discussing and planning using fancy wallpaper to create an accent wall behind our bed. After painting (and again, repainting, because making decisions is hard) the bedroom, it was time to purchase some wallpaper. To our shock, the wallpaper prices were way more than we were willing to spend. An 8’ by 16’ wall would’ve run us around $1,000. No thanks.
So, after perusing a few different DIY websites, Jonna suggested the idea of a floor-to-ceiling wooden headboard. After the suggestion, I had two thoughts:
After checking out how others did it, though, I decided that I was willing to undertake the challenge.
Step One: Planning
The first step was to decide what type of wood we wanted to use. Others online sang the praises of using pallet wood—it’s (usually) free, and is easy to work with. We elected to use long, full boards due to the simplicity of having less boards to work with.
We took a trip to the hardware store and began laying out different sizes of wood on the ground. We looked at all different widths, and decided to use three different widths of wood:
Because I was determined to have everything planned out before I started, we didn’t buy anything that night, and I spent the next few days planning how the wood would be arranged. Since it’s impossible to get stain to look completely uniform across a board (let alone multiple boards), it was important to me that I had a plan. I made these to-scale designs in Photoshop.
However, my latest project dwarfed them all—a floor-to-ceiling wooden headboard!
The idea was born after we had spent a few weeks discussing and planning using fancy wallpaper to create an accent wall behind our bed. After painting (and again, repainting, because making decisions is hard) the bedroom, it was time to purchase some wallpaper. To our shock, the wallpaper prices were way more than we were willing to spend. An 8’ by 16’ wall would’ve run us around $1,000. No thanks.
So, after perusing a few different DIY websites, Jonna suggested the idea of a floor-to-ceiling wooden headboard. After the suggestion, I had two thoughts:
- That is way beyond my burgeoning skills as a handyman
- We live in a condo. I don’t have access to a garage, or power tools.
After checking out how others did it, though, I decided that I was willing to undertake the challenge.
Step One: Planning
The first step was to decide what type of wood we wanted to use. Others online sang the praises of using pallet wood—it’s (usually) free, and is easy to work with. We elected to use long, full boards due to the simplicity of having less boards to work with.
We took a trip to the hardware store and began laying out different sizes of wood on the ground. We looked at all different widths, and decided to use three different widths of wood:
- 12 inch
- 6 inch
- 4 inch
Because I was determined to have everything planned out before I started, we didn’t buy anything that night, and I spent the next few days planning how the wood would be arranged. Since it’s impossible to get stain to look completely uniform across a board (let alone multiple boards), it was important to me that I had a plan. I made these to-scale designs in Photoshop.

Here's what the headboard might look like with a 12 - 6 - 4 pattern.

This is what it might look like with a wave pattern (12 - 6 - 4 - 6 - 12).

Here I assorted boards randomly. (We really didn't like this one).

This is the pattern we decided on.
After discussion—and discovering the hardware store almost never stocks enough 12-inch wood—we decided on a simple 6”-4”-6” system.
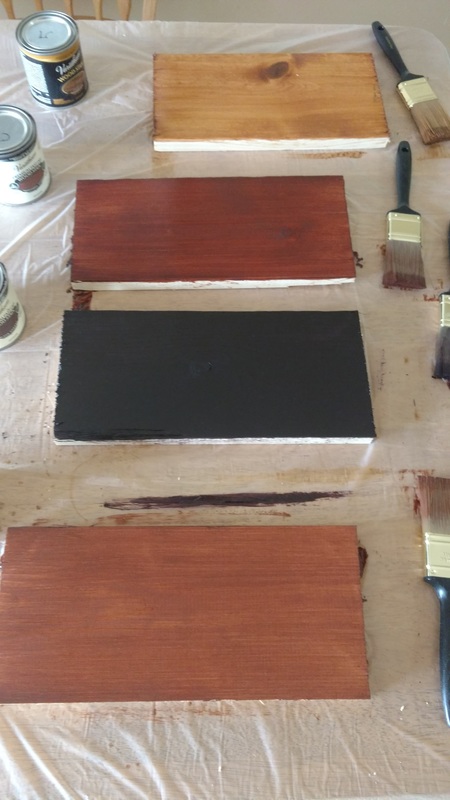
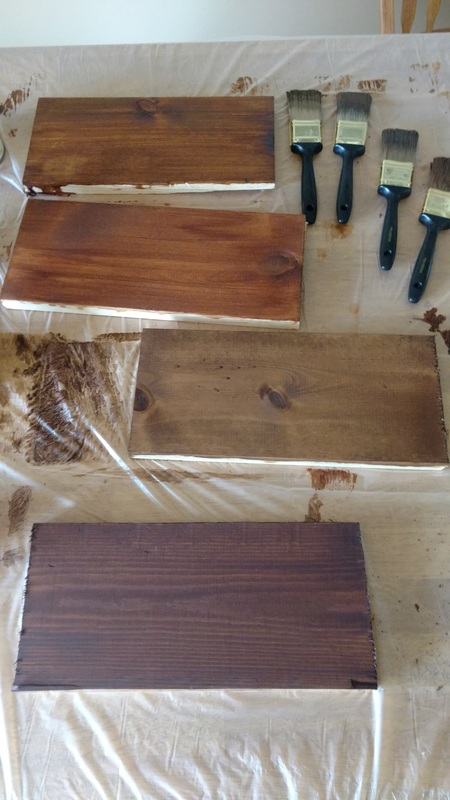
After that came finding a stain color that we liked. In hindsight, I wasted a LOT of time and money on this step. Unbeknownst to me, the hardware store sells stain samples in ketchup packets, so you use exactly the amount you buy. At first, I was buying small cans, using barely a fifth of them, and donating/disposing of the rest!
In addition, finding a stain that looked good, matched our color scheme, and wasn’t ten shades darker than advertised became a tedious adventure.

|
|
Finally—FINALLY—we came upon a stain that we liked: Varathane’s “Early American.”
Step Two: Staining
At last, it was time to begin staining the wood! In a regular house with a back yard, this could’ve all been done in a day. But for us this wasn’t the case. Remember when I said we’re in a condo? We DO have a large balcony that I could’ve worked on—but in true “make this as difficult as possible” fashion, our balcony was undergoing maintenance all summer, making it unavailable for use. So, I had to stain the wood on our dining room table, being careful only to do a few boards a day, as to not fill the condo too full with fumes. This was by far the longest part of the process. What could be done in one long day took me about two weeks.
Step Three: Support System
The second to last step was one that I was the most nervous about from the beginning. Using DIY websites as a guide, I decided that putting all 20-something boards directly into the wall would be too destructive, and instead made support boards for the headboard to nail into.
After finding exactly where on the wall we wanted the headboard, we purchased four 2” by 1” boards, cut them to the height of our wall, and drilled screws into the steel studs behind our bedroom wall.
Finding studs has always been something that drives me crazy (stud finders are notorious liars), and I soon learned that finding STEEL studs involved even more guesswork.
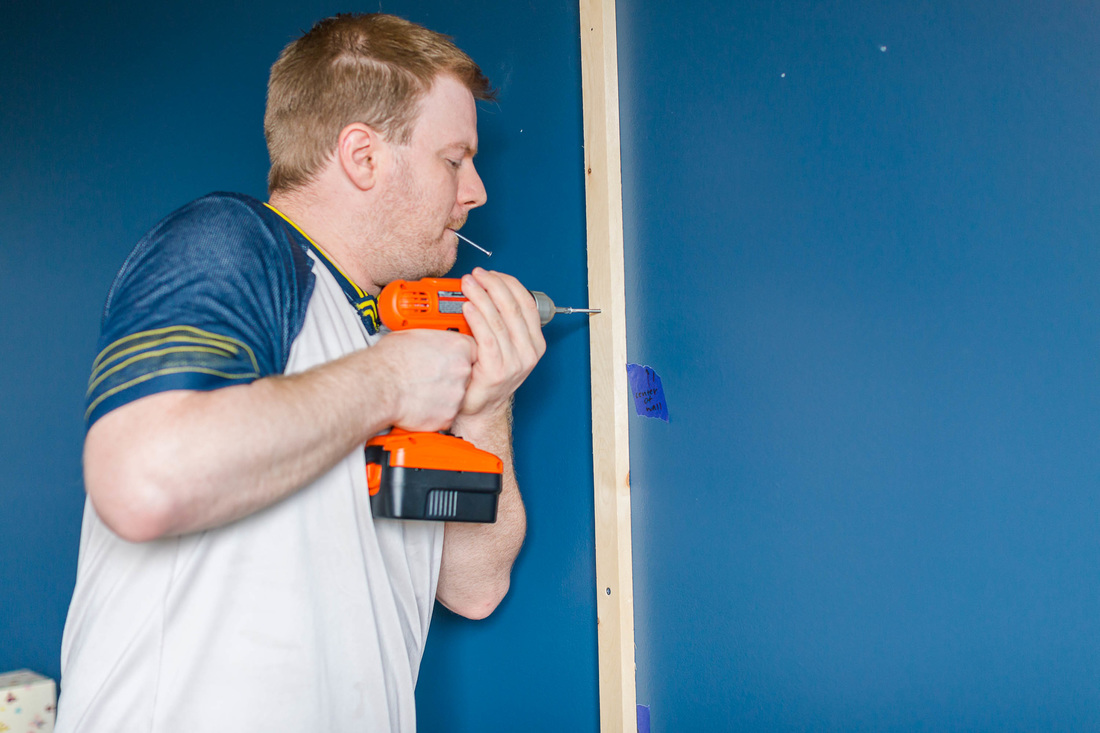
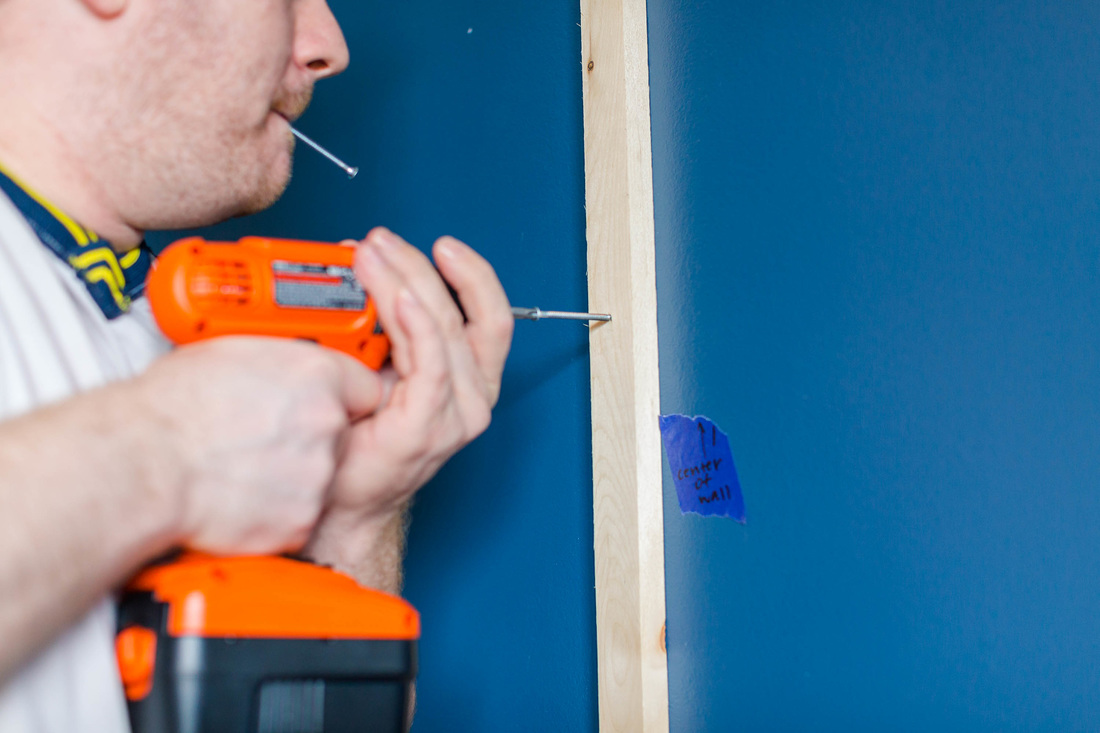
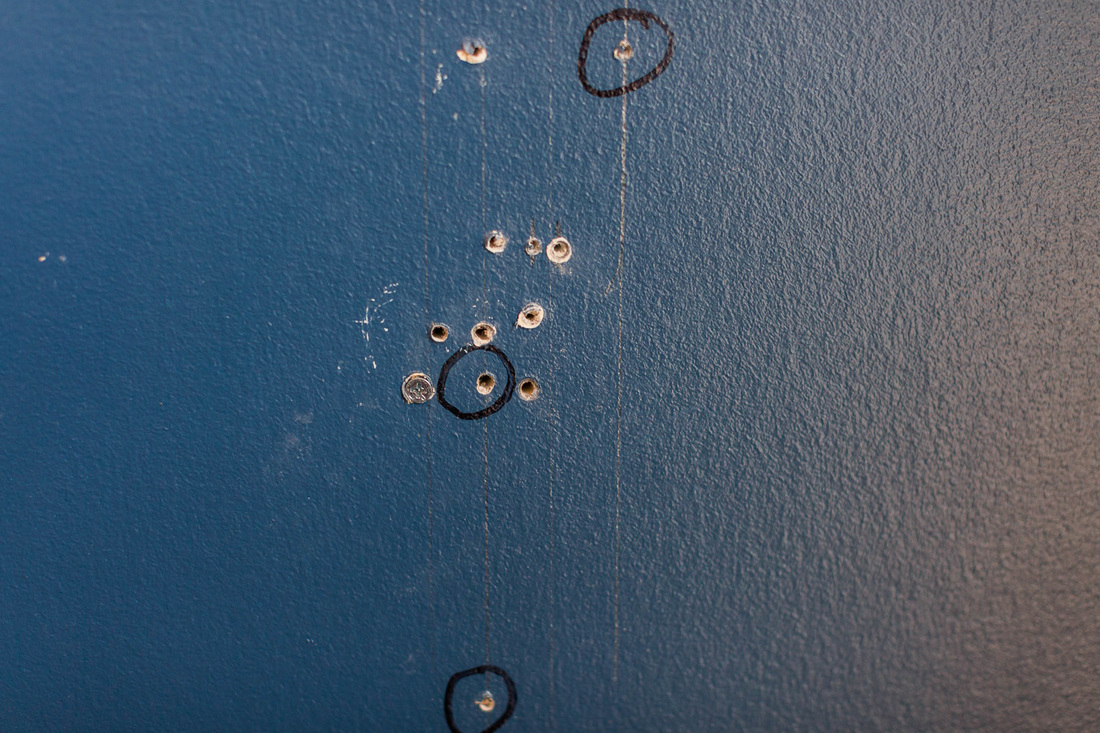
Stud finders lie.
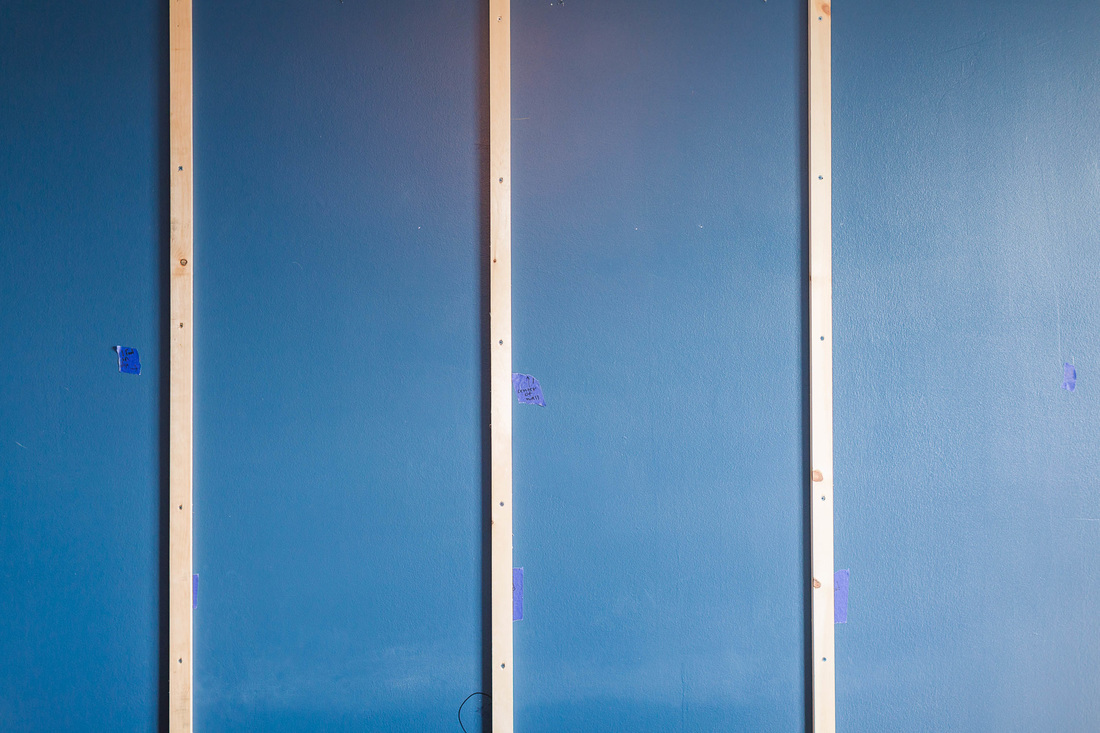
In addition, thin, cheap pieces of wood are anything but straight. So, they needed to be attached to the stud slowly, so I could straighten the boards the best I could as I went down each piece. If we weren’t so cheap, this could’ve been much more easily accomplished with a good stud finder and quality lumber, but we are who we are, and our miserly ways made this step—once again—more difficult than it needed to be.
Step Four: Planning the Layout
The night before the big day, Jonna and I laid out all the wood on the floor and began organizing them in the order we wanted them to appear on the wall. At first, this seems unnecessary, but because of the semi-random nature of cheap wood and stain, there were some boards we wanted to feature more prominently, and others that we had no problem with being hidden from view behind the bed. We found an order we were happy with, and used a permanent marker to number them (on the back, of course).
Step Five: Putting it all Together
The last step was surprisingly easy, and somewhat anticlimactic (since there were no major screw ups). Jonna and I were able to put the entire headboard up in just over an hour. Jonna held the boards, while I hammered two nails in per stud (8 nails per board).
As Jonna posted for the preview, here is a time-lapse video of the process:

 RSS Feed